0xc000000e chybě dochází při pokusu o spuštění programu Windows znamená, že máte co do činění s poškozeným konfiguračních dat spouštění. Konfigurační data zavádění je globální úložiště pro všechny možnosti a nastavení související se zaváděním v novějších počítačích se systémem Windows.
Tato chyba se zobrazí při pokusu o spuštění zařízení a zobrazí se vám černá obrazovka s pokyny k opravě počítače pomocí instalačního disku nebo jednotky pro obnovení. Bohužel mít tento disk pro obnovení je jediný způsob, jak tento problém vyřešit, takže byste měli mít jeden před zahájením. Pokud ho nemáte, je poměrně snadné jej vytvořit pomocí nástroje Rufus nebo Windows Media Creation z jakéhokoli jiného počítače nebo notebooku.

Budete také muset zavést systém BIOS, abyste změnili pořadí zavádění a spustili počítač z jednotky pro obnovení namísto pevného disku. Chcete-li to provést, použijte následující kroky:
- Vstupte do nastavení systému BIOS nebo UEFI stisknutím klávesy určené výrobcem základní desky před spuštěním systému Windows. Tímto klíčem je obvykle Esc, Delete, F2, F8, F10, F12 nebo Backspace, v závislosti na výrobci. Můžete provést online vyhledávání, jak vstoupit do systému BIOS, a poté model vašeho počítače.
- Jakmile jste uvnitř, přejděte na Boot Pomocí pokynů v BIOSu změňte pořadí spouštění a nastavte buď CD-ROM nebo USB port jako první zařízení, v závislosti na tom, zda je vaše jednotka pro obnovení CD nebo flash disk .
- Uložte nastavení a ukončete.

Metoda 1: Znovu sestavte konfigurační data spouštění
Chcete-li to provést, budete muset spustit počítač z jednotky pro obnovení. Pokud jste nakonfigurovali systém BIOS podle výše uvedených kroků, můžete tak učinit stisknutím libovolné klávesy, jakmile se na displeji zobrazí výzva. Po spuštění počítače z jednotky pro obnovení proveďte následující kroky k opětovnému sestavení BCD:
- V dialogovém okně Nastavení systému Windows nastavte všechny příslušné hodnoty, vyberte svůj jazyk a klepněte na
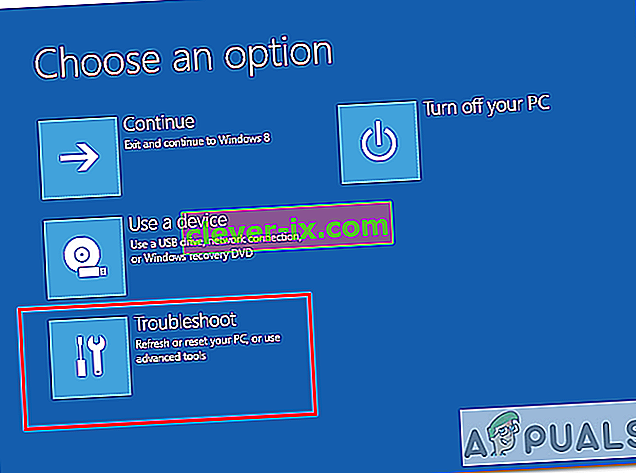
- V levém dolním rohu klikněte na opravě počítače , a rozhodnout se Poradce při potížích z obrazovky možnost.
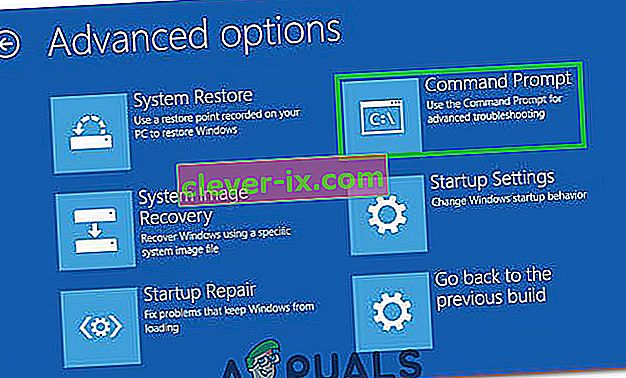
- Na obrazovce Řešení potíží klikněte na Pokročilé možnosti a poté na Příkazový řádek.
- Po otevření příkazového řádku zadejte následující příkazy a po každém z nich stiskněte na klávesnici klávesu Enter :
bootrec / scanos bootrec / fixmbr bootrec / fixboot bootrec / rebuildbcd
- Restartujte počítač a měl by se dobře spustit, aniž byste se znovu setkali s problémem.

Metoda 2: Opravte operační systém pomocí jednotky pro obnovení
Tato metoda také opraví váš operační systém pomocí příkazového řádku jednotky pro obnovení a měli byste být schopni zavést systém Windows, aniž byste se znovu setkali s problémem. Spusťte systém z jednotky pro obnovení a postupujte podle pokynů níže.
- Pomocí kroků 1 až 3 z předchozí metody přejděte na příkazový řádek jednotky pro obnovení.
- Jakmile se dostanete do příkazového řádku, zadejte níže uvedené příkazy a poté je zadejte klávesou Enter . StartRep.exe utility koriguje hodnoty boot prostředí a měla opravit chybu BCD. Možná budete muset tento krok opakovat několikrát, pokud selže.
cd x: \ sources \ recovery StartRep.exe
- Pokud předchozí krok opravy systému Windows nepomohl, zadejte do příkazového řádku bcdedit a zobrazte hodnoty pro Správce spouštění systému Windows.
- Poznamenejte si hodnoty pro Zařízení . Pokud nejsou známy , zadejte následující příkazy, za nimiž následuje klávesa Enter . V případě potřeby byste měli nahradit C: oddílem, na kterém je nainstalován váš operační systém.
bcdedit / set {DEFAULT.EN_US} oddíl zařízení = c: bcdedit / set {DEFAULT.EN_US} oddíl osdevice = c: bcdedit / set {BOOTMGR.EN_US} oddíl zařízení = c:- Po dokončení příkazového řádku jej zavřete, vyjměte jednotku pro obnovení a restartujte systém. Nyní by to nemělo mít žádné problémy.
Jedinou nevýhodou těchto řešení je, že vyžadují zotavení, trpělivost a pevné nervy. Pokud je však budete sledovat, jak jsou popsány, měli byste opravit chybu, kterou jste dostali, a pokračovat v používání zařízení jako dříve.
Metoda 3: Povolení podpory Windows 10 WHQL v systému BIOS
U některých výrobců OEM existuje nastavení Windows WHQL Support. Má dvě základní funkce: kontroluje podepsané ovladače během procesu spouštění a umožňuje povolit podporu UEFI. Pokud používáte Windows 10, musíte jej povolit, aby se počítač mohl normálně spustit. Pokud to však není vybráno, může se váš počítač zavést do chyby 0xc000000e. V systému BIOS tedy můžete zjistit, zda je povoleno nastavení podpory Windows 10 WHQL. Pokud ne, povolte to a zkuste to.
Měli byste si uvědomit, že nastavení podpory Windows 10 WHQL není podporováno ve všech počítačích. Pokud jej váš počítač nemá, můžete zkontrolovat, zda je ve vašem počítači povolena podpora UEFI. Pokud ne, můžete jej povolit a zjistit, zda chybový kód 0xc000000e zmizí. Chcete-li to povolit:
- Vypněte počítač úplně a počkejte alespoň pár minut.
- Poté, co se ujistíte, že uplynul přiměřený čas, spusťte počítač zpět a měli byste si všimnout možnosti „ Stisknutím tohoto tlačítka spustíte režim Bios “.
- Stisknutím tlačítka spustíte režim Bios.
- Po úspěšném zavedení v režimu Bios zkontrolujte, zda je v systému Bios nastavení Windows WHQL.
- Pokud je k dispozici, vyberte jej stisknutím klávesy „Enter“ po jeho zvýraznění pomocí kláves se šipkami a výběrem možnosti „Povoleno“ ji ve svém počítači povolte.

- Zkontrolujte, zda se tím problém vyřeší.

Pokud se chyba spouštění systému Windows 10 0xc000000e stále zobrazuje po povolení nastavení podpory Windows 10 WHQL nebo podpory UEFI, možná budete muset resetovat konfiguraci systému BIOS / UEFI v počítači.
Metoda 4: Znovu sestavte BCD pomocí nástroje Easy Recovery Essentials
Easy Recovery Essentials je funkce automatické opravy systému jediným kliknutím, která zahrnuje úplnou opravu a rekonstrukci BCD k vyřešení chyby „0xc000000e“, a to i v případech, kdy se Windows v důsledku chyby nespustí.
Součást automatizované opravy bootování EasyRE bude řešit všechny problémy související s BCD, opravovat BCD nebo jej znovu vytvořit od nuly pomocí správného kódování a cesty pro oddíl, který se odmítá správně načíst. Rovněž označí disk jako online, aby se zajistilo jeho správné fungování.
Je zaručeno, že program Easy Recovery Essentials automaticky opraví chybu „0xc000000e“ pomocí integrované možnosti automatických oprav. EasyRE je aktuálně k dispozici pro Windows XP, Vista, 7, 8, 10 a lze jej stáhnout a vytvořit na libovolném počítači.
- Získejte další počítač, který byste mohli použít k vytvoření USB, ze kterého budeme počítač spouštět.
- Stáhněte si nástroj Easy Recovery Essentials odtud.

- Vypálit obraz.
- Spusťte počítač z disku CD nebo USB Easy Recovery Essentials, které jste vytvořili.
- Jakmile je EasyRE spuštěný, vyberte možnost „Automatická oprava“ a klikněte na Pokračovat.
- Poté, co EasyRE prohledá jednotky vašeho počítače, identifikujte a vyberte ze seznamu písmeno jednotky pro instalaci systému Windows a poté začněte kliknutím na možnost Automatická oprava .
- Aplikace Easy Recovery Essentials začne analyzovat problémy s vybraným diskem. EasyRE otestuje a pokusí se automaticky opravit chyby na disku, diskovém oddílu, bootovacím sektoru, souborovém systému, bootloaderu a registru. Není nutný žádný zásah, protože oprava EasyRE je plně automatizovaná.
- Jakmile je proces dokončen, společnost EasyRE oznámí svá zjištění. Klepnutím na tlačítko Restartovat restartujte počítač a vyzkoušejte změny.

Metoda 5: Obnovte konfiguraci systému BIOS / UEFI
Někteří uživatelé uvedli, že jejich problém s chybou 0xc000000e je vyřešen resetováním konfigurace systému BIOS / UEFI. Můžete tedy zvážit vyzkoušení této metody a zjistit, zda lze tento problém vyřešit.
Krok 1. Otevřete nabídku BIOS
Chcete-li obnovit výchozí nastavení systému BIOS, musíte nejprve vstoupit do nabídky systému BIOS a vyhledat možnost Výchozí nastavení.
Uživatelé systému Windows 10 mohou přistupovat k pokročilým možnostem spuštění systému Windows 10 a dostat se do nabídky systému BIOS. Můžete kliknout na Start -> Napájení, stisknout a podržet klávesu Shift a kliknout na tlačítko Restartovat a restartovat Windows do prostředí Windows Recovery Environment. Poté klikněte na Poradce při potížích -> Pokročilé možnosti -> Nastavení firmwaru UEFI a kliknutím na Restart přejděte na obrazovku nastavení systému BIOS.
Alternatively, you can also restart your computer normally and press the required key in the startup screen to boot into the BIOS settings window. The hotkey is varied from different computer manufacturers, and it could be F12, Del, Esc, F8, F2, etc.
Step 2. Find the Setup Defaults Option
The name and location of the “Setup Defaults” option may be different from various computers. It generally calls like: Load Default, Load Setup Defaults, Load Default Settings, Load BIOS Defaults, Load Optimal Defaults, etc.
Use the arrow keys on the computer keyboard to find the BIOS setup default option in the BIOS settings screen. You may find it in one of the BIOS tabs.
Step 3. Reset BIOS
After you find the Load Setup Defaults option, you can select it and press the Enter button to start resetting the BIOS to factory default settings in Windows 10.
At last, you can press F10 to save and exit BIOS. Your computer will automatically reboot. If you need to change BIOS settings again in the future, you can follow the same instructions to access BIOS again to change it.
Method 6: Mark Boot Disk As Online
It is possible in some cases, that the disk that you have connected to the computer or the USB that you are trying to boot from has been marked as offline by the computer. Some computers tend to prevent extra applications, hardware, and other things from being able to run as soon as the computer starts because it allows for more convenient and fast startup experience. Therefore, in this step, we will be marking the Disk as online.
You still need to use a bootable USB medium to do this job. We will show you a step-by-step guide here:
- After booting your computer from the bootable USB drive, you need to go to Next > Repair your computer. Then, you will enter WinRE.
- Go to Troubleshoot > Advanced options > Command Prompt.
- Make sure to properly enter your login credentials if you are asked by the computer.
- Type in the following command inside the command prompt to successfully launch the disk part utility on your computer.
diskpart
- Type in either one of the following commands in the next window to list the currently connected disk drives to your computer.
List Disk List Volume
- Once the disks have been listed, you need to identify the disk that contains the Windows operating system and the one that you want to mark as active.
- After identifying it, select the disk using the following command and replacing the alphabet with the driver letter of that disk.
select disk A Select Volume A (Replace A with the Drive Letter)
- After you have successfully selected the disk, you must mark the disk as online in order to initiate the recognization process of the disk at startup. Use the following commands to do that.
Online Disk Online Volume
- Type in the following command to successfully get out of the command prompt and restart your computer after that.
Exit
- Check to see if marking the Disk as online has fixed your issue.

Method 7: Check your data cables, BIOS and drivers
Unplug all HDD data cables, and then plug them again. Revert to the previous drivers and BIOS settings if they were changed, or use “Restore factory settings” option in the BIOS. Make sure to write down all current BIOS settings that were previously selected, just in case it is required to switch back. If the error is caused by a change of the SATA disk controller’s mode in the BIOS or firmware, the fix can be as simple as entering the BIOS and toggling the SATA controller’s “mode” setting. The exact instructions differ from one manufacturer to the other, but the options will resemble what is shown in the screenshots below.
To check the boot order, follow these steps:
- Restart the computer
- Press the necessary key to open the BIOS menu. This key depends on the computer manufacturer and computer model. This is usually listed on the first screen that appears on the monitor. It can be any of the following: Esc, Del, F2, F8, F10 or F12.
- If the screen shows multiple keys, find the key to open “BIOS”, “setup” or “BIOS menu”
- Attempt to toggle between all three (or more) modes until a combination that results in Windows booting successfully once more is found.
Method 8: Boot Windows In Safe Mode
If above solutions didn’t fix the problem, then Start Windows into safe mode. This will start your PC with minimum system requirements, will not load startup programs, add-ons etc. And allow performing troubleshooting steps to fix Boot Error 0xc000000e:
Before you enter the safe mode, you need to enter the Windows Recovery Environment (winRE). To do this, you will repeatedly turn your device OFF, then ON:
- Hold down the power button for 10 seconds to turn off your device.
- Press the power button again to turn on your device.
- On the first sign that Windows has started (for example, some devices show the manufacturer’s logo when restarting) hold down the power button for 10 seconds to turn off your device.
- Press the power button again to turn on your device.
- When Windows restarts, hold down the power button for 10 seconds to turn off your device.
- Press the power button again to turn on your device.
- Allow your device to fully restart and you should boot into the Windows Recovery Environment.
Now that you are in the Windows Recovery Environment, you will follow these steps to take you to safe mode:
- On the Choose an option, screen, select “Troubleshoot” and then “Advanced options.”
- Now click on “Startup Settings” and click on “Restart.”
- After your device restarts, you’ll see a list of options. Select option “4” from the list or press “F4” to enter Safe Mode.

Note: If you need to exit safe mode, simply restart your device, or:
- Press the “Windows logo key + R.”
- Type “msconfig” in the Run box and then select “OK”.

- Select the Boot tab and under Boot options, clear the Safe boot checkbox.

Method 9: Check your disk with CHKDSK utility
If the hard drive has its file integrity compromised, it is possible to use built-in Windows CHKDSK utility to scan the disk and fix the file system errors.
- Connect a USB drive that has been made bootable or insert the Windows Installation Disk on your computer.
- After connecting one of these, boot from that connected device.
- After booting your computer from the device, click on “Next” and then on the “Repair your Computer” option.
- On the next window, click on “Troubleshoot” and then on the “Advanced” Option.

- On the next screen, make sure to select the “CommandPrompt” option to successfully launch into the command prompt.
- Provide the login credentials of your account in order to boot inside the cmd.
- Inside the command prompt, type in the following command to successfully run the check disk utility on your computer.
chkdsk C: /f (Make sure to replace the "C" with the Drive letter of your partition).
- Confirm any on-screen prompts and wait for the scan to be fully completed.
- Check to see if the issue is fixed by performing this step.
Method 10: Disable fast startup Feature
If your computer has been set up to use the Fast Startup feature, you might be getting this error message on your screen because of doing so. The Fast Startup feature is known to malfunction with some operating systems and hardware combinations.
Basically, when enabled, the feature automatically sends some launch configurations to be stored in your RAM to allow for a faster startup as indicated by its name but this configuration data can sometimes be corrupted which can lead to this error on your computer. Therefore, in this step, we will be disabling it completely. For that:
- Press “Windows” + “R” to open the Run prompt.
- Type in “Control Panel” and press “enter” to launch the classical Control Panel interface.
- Inside the control panel, click on the “Hardware and Sound” option and then select the “Power Options” button.

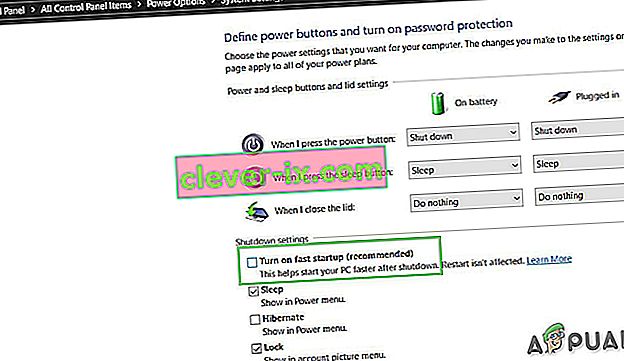
- Inside the power options, click on the “Choose what the power button does” from the left side.
- Click on the “Change Settings” option if the fast startup option is greyed out.
- Make sure to uncheck the “Turn on Fast Startup” option and save your changes.
- Closeout of the window and terminate any unnecessary applications.
- Click on the “Start Menu”, click on the “Power Options” and select “Shutdown” from the list.
- This option should completely power down your computer and after performing a complete shutdown, wait for some minutes before turning your computer back on.
- After the computer turns back on, check to see if the error message is fixed.
Note: This solution can only be applied if you are able to sometimes boot up your computer normally and are only encountering this error momentarily.


Method 11: Repair Corrupted System Files
It also possible in some situations that certain system files might have been corrupted due to a storage failure or due to some other reason. Therefore, in this step, we will be performing a complete repair of the corrupted system files and then we will check to see if doing so fixes this issue. For that:
- Press “Windows” + “R” to open the Run prompt.
- Type in “cmd” and then press “Shift” + “Ctrl” + “Enter” to launch the command prompt with admin privileges.

- Type in the following commands one by one and press “Enter” after each to successfully run an SFC scan and a DISM Scan on your computer.
DISM /Online /Cleanup-Image /RestoreHealth sfc /scannow
- Restart your computer completely once these scans are completed.
- Check to see if by performing these scans, you were able to fix this issue on your computer.

Method 12: Run Windows Startup Repair
Startup Repair is capable of diagnosing and fixing the found issues. For example, it can automatically scan system files, registry settings, configuration settings, etc. and try to fix the problem on its own. Startup Repair is especially useful when your computer is unbootable. Since your computer fails to boot, Windows can boot into WinRE automatically. While, if it doesn’t appear, you can interrupt the boot process three times in a row, and then the WinRE screen appears. Alternatively, if you have a bootable USB medium, you can also set your computer to boot from it and go to Repair your computer to enter WinRE.
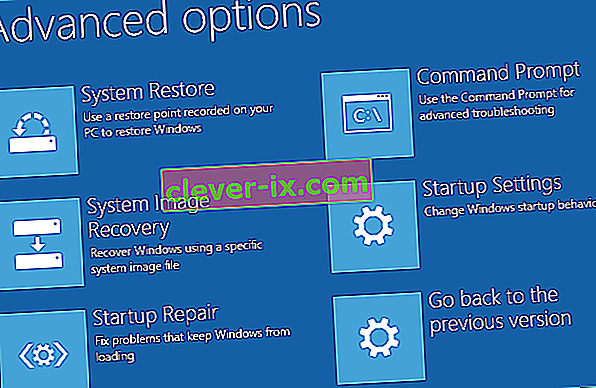
After you have successfully booted into the Windows Recovery Environment, click on the “Troubleshoot” option, and from there, select the “Advanced Options” screen. Inside the advanced options, select the “StartupRepair” button to successfully initiate the Startup Repairing process. Windows will begin to diagnose your computer automatically. When the process ends, your computer will restart automatically. You can wait to see whether it can boot successfully.

Řešení: Ujistěte se, že nejsou připojena žádná další zařízení, než skočíte do příkazového řádku nebo Startup Repair, je nejlepší vyzkoušet další restart s nejmenším počtem zařízení a externích jednotek připojených k počítači. Tím zajistíte, že nic, co bylo nedávno přidáno do počítače, tento problém nezpůsobuje. Nejlepší by bylo odpojit všechny nejnovější USB disky, CD, DVD atd. Patří sem také čtečka paměťových karet. Ujistěte se, že byly odpojeny všechny externí disky a USB klíče nebo USB propojovací jednotky, a potom to zkuste znovu.


